Download and print as a PDF (2MB pdf)
On this page
- What is this information about?
- What is a distal radius fracture?
- Common problems
- Time scales
- Key elements within your recovery
- Wrist rehabilitation exercises
- Wrist rehabilitation exercises – Stage 2
- Wrist rehabilitation exercises – stage 3
- Strengthening exercises
- Wrist rehabilitation exercises – Stage 4
- Glossary Of Terms
- Educational video links
- Hand Therapy Service contact details
What is this information about?
The aim of this booklet is to help our patients who have had a distal radius fracture. Here you will find helpful information on recovery and exercises, as well as our contact details should you need any further advice and assistance.
What is a distal radius fracture?
The radius is one of the two bones in the forearm, the other being the ulna. The distal part of the radius is the end nearest your wrist. This part of the radius is commonly broken. A small break at the end tip of the ulna often accompanies this injury.
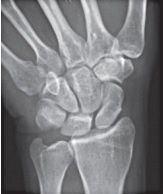
These fractures are normally treated by immobilisation with a splint or plaster cast for approximately four weeks, depending on the position and severity of the fracture.
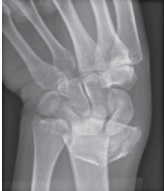
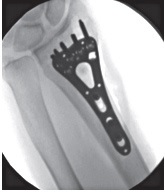
If the bones have moved significantly out of position, then you may have needed to have the fracture manipulated or corrected with surgery. It is normal to experience stiffness and swelling after a fracture and it must be noted that the removal of the cast or dressing is only the start of your recovery.
Common problems
A percentage of our patients notice an increase in thumb pain after a distal radius fracture. However, this should settle with time. It is important to keep the thumb moving, but not to over-stress it with repetitive pinching/gripping and twisting activities.
Discomfort in the wrist on the side of the little finger is also common, particularly if you were also diagnosed with an ulna fracture. There is a ligament complex within this area which may have also been injured alongside the fracture. Normally, this does not require any treatment, but it can take months for this discomfort to settle. If this is a particular problem for you, please discuss your symptoms further with your hand therapist or consultant.
Some numbness or a mild pins and needles sensation may also accompany your injury. This is due to the fact that the nerves may have been aggravated at the point of injury or with the following swelling. This should settle over the following months, but if you feel that the symptoms are becoming more frequent, affecting your hand function and/or becoming increasingly painful, then please contact the department to discuss your symptoms.
Very occasionally, patients with a distal radius fracture develop a rupture (tear) in the long tendon that lifts the tip of the thumb up (extensor pollicis longus). This is a nuisance and patients often decide to have a tendon transfer to restore this function.
Post fracture you may notice that your wrist may have a slightly different appearance. These changes are normally cosmetic in nature, but these changes should not affect your regaining functional use of your wrist.
Time scales
Key elements within your recovery
Swelling
Swelling is a common problem post fracture. Controlling your swelling can promote recovery of normal hand function. Elevating your hand regularly throughout the day can help to drain away the fluid. Whilst your hand is raised, try rapidly making a fist 5-10 times. Stroking your hand/wrist can also help to move the swelling. This can be completed using long firm strokes starting from the fingertips in a downward direction towards your elbow. Another option is to apply an ice pack to the area.
Scar
If you have had surgery, you will also be advised to complete regular scar massage. Apply a deep circular massage with firm pressure 6 times daily for approximately 3 minutes to the scar and the surrounding area. You may also use a gentle non perfumed moisturiser. If your scar feels very sensitive, regular touch will also help to calm this down. Exposing the area to different textures, i.e. sleeves of clothing, will help the wrist adapt to normal stimulus.
Light function
As soon as your cast/dressings are removed, it is important to start to use your injured hand in normal day-to-day activities. You can complete all normal light functional activities such as washing and drying up, getting dressed and using a keyboard. The more you use your wrist and try to regain normal function, the quicker it will recover.
Grip
Regaining finger movement is also a key focus of early stages. We would advise you to regularly complete the finger exercises with a focus on achieving a full fist and extension rather than wriggling the fingers. Alongside these specific exercises, whenever you grip hold of household objects such a toothbrushes, cutlery or hairbrushes, you should attempt to close your fingers fully around the diameter.
Splint
You may have been provided with a splint after your injury e.g. a Futura splint (pictured). We would advise that you gradually start weaning off this in order to strengthen your wrist. Initially, stop wearing the splint at home or when in low risk areas, and then aim to stop wearing your splint at night and when out in public spaces.

Home exercise programme
It is important to complete the exercises provided by your hand therapist/consultant. The aim is for you to recover your range of movement (ROM) and strength post injury. Evidence has shown that regular completion of exercises will improve your outcome post fracture.
Heat
To assist regaining your movement, you may use heat prior to completion of exercises. For example, you may complete your exercises in the shower, or place a hot water bottle/warmed towel on the wrist 5-10 minutes before.
Pain
It is normal to have some level of discomfort post fracture. This is not an indication of a new injury or that you have unsettled the fracture. We would suggest that you work to the level of an unpleasant stretch. On a pain scale, we would suggest this to be around 5 out of 10 discomfort – this discomfort should settle down quickly on completion of the activity (within 30 minutes). If you are regularly experiencing significant pain, or for a significant period post exercise, please discuss your symptoms further with your hand therapist or consultant.
Wrist rehabilitation exercises
Finger exercises
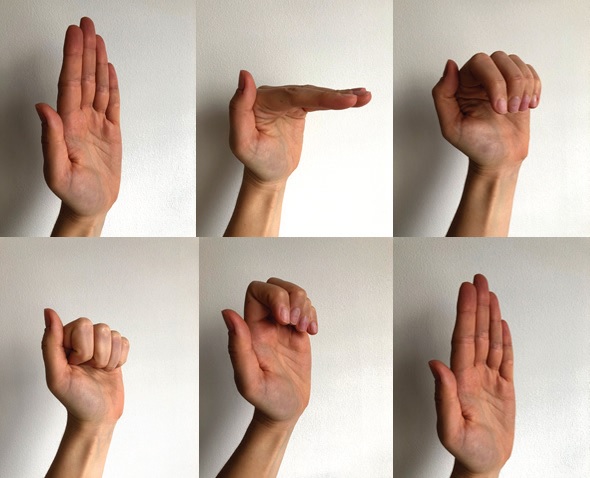
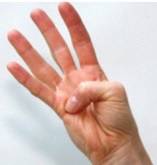
Tendon gliding: complete the sequence of finger exercises. Increase the stretch into each position, using the other hand to assist the movement if the fingers feel stiff. Repeat 5 times.
Thumb exercises
Thumb opposition: Touch the tip of each finger in turn with the tip of the thumb then move
the tip of the thumb down the length of the little finger to its base. Repeat 5 times.

Wrist rehabilitation exercises – Stage 2
Continuing with the exercises above, start the below exercises on removal of your cast or dressings.
You should feel that your movement is slowly progressing with these exercises. If you feel you are struggling or are making limited improvements with your rehabilitation, please contact the hand therapy department. You may benefit from face-to-face rehabilitation such as our distal radius fracture group
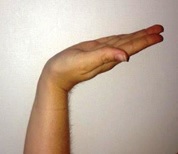
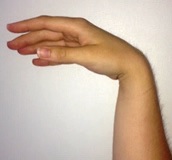
Active extension and flexion
Bend the wrist backwards (extension) until you feel tightness. Hold the stretch for the count of 10-15 seconds. Then bend your wrist forwards (flexion) until you feel tightness. Hold the stretch for the count of 10 -15 seconds. Repeat 5 -10 times.
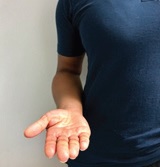
Active supination and pronation
Keeping your elbow tucked into your side, rotate your forearm so the palm of your hand faces upwards (supination) and then rotate your forearm in the opposite direction (pronation). Hold each stretch for the count of 10 -15 seconds in each direction. Repeat 5-10 times.
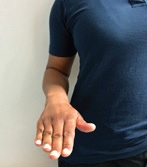
Dart throwers motion
Rest your elbow on a table. Hold onto a pen with a light grip. Pretend you are going to throw the pen like a dart by bending your wrist back in the direction of your thumb, and then move your wrist forward towards your little finger. Repeat 5 times.
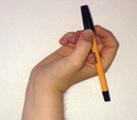
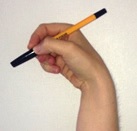
The following exercises focus on increasing your movement further. You will be using your other hand to assist the stretch. We would suggest you are guided by your discomfort, gently pushing into each movement holding the position at the point of stretch. See page 8 for more details about appropriate pain levels.
Passive extension and flexion
Bend the wrist backwards (extension) until you feel tightness. Then use your other hand to push into the movement. Hold this for 30 seconds. Bend the wrist forwards (flexion) until you feel tightness. Then use your other hand to push into the movement. Hold this for 30 seconds. You may find it easier to complete this exercise with your hand over the side of a table. Repeat 2 times.
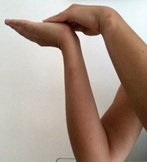
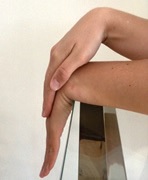
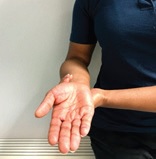
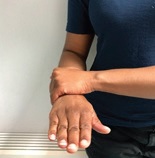
Passive pronation and supination
Keep your elbow tucked into your side. Rotate your forearm so the palm of your hand faces upwards (supination) and then downwards (pronation). Use your other hand to gently push your wrist further into each position. Hold each stretch for the count of 30 seconds in each direction.
Prayer stretch
Place both hands together with your elbows bent (as though praying), ensuring your palms are touching. Slowly bring your hands down the centre of your body, maintaining contact at the palms throughout. Hold for a count of 30 seconds. Repeat 2 times.

These exercises are designed to increase your ability to perform day-to-day tasks and control objects.
Rolling an object
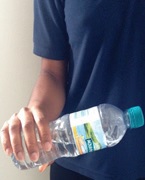
Rest your hand and wrist on an uneven surface such as a ball, rolled magazine, cushion or water bottle. Without leaning through the object, roll your hand and wrist over it slowly and smoothly. If using a cushion or a ball, try to control your movements in a circular pattern or try to write your name.


Control of forearm rotation
Start with your elbow tucked into your side, your palm is facing upwards and your chosen weight in your hand (e.g. a rolled up magazine as shown in the pictures). Move your hand slowly and smoothly so that your palm is facing downwards. Then slowly return to the starting position. Make sure you keep your elbow tucked into your side throughout the exercise. Repeat 5 times.


Wrist rehabilitation exercises – stage 3
The following exercises are designed to help increase the stability and strength of your wrist. They should be started at around 6 weeks post your injury/surgery.
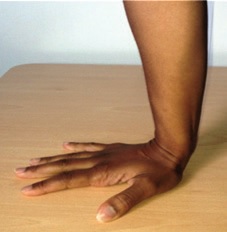
Weight-bearing on a table
While standing, place your hand flat on a table. Lean through the table with 25%, 50%, 75% or 100% of your weight. Hold the position for 5 – 10 seconds.
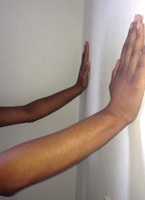
Weight-bearing on a wall
When happy weight bearing onto a table, you can progress to weight bearing on a wall.
Face a wall and stand a little further away than an arm’s length away with your feet shoulder width apart. Lift your arms and place your palms flat against the wall at shoulder width apart. Lean into the wall increasing your weight as you feel comfortable to do so. Hold the position for 3-5 seconds.
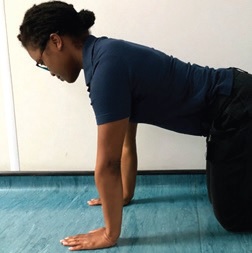
Weight-bearing on the floor
When happy with weight bearing onto a wall, you can progress onto the floor, if relevant to you.
While kneeling on the floor place your palms flat on the floor in front of you. Lean into the floor increasing your weight as you are able to tolerate.
Strengthening exercises
The following exercises are designed to help increase the stability and strength in the wrist. Your therapist will assess to see what level of exercise you should begin with and progress your program as you improve.
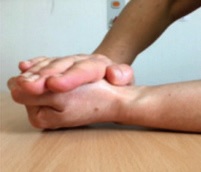
Isometric blocking exercises flexion
Rest your forearm on the table, palm up. Bend (flex) wrist. With your unaffected hand, gently push down on your hand and resist this force so that your wrist doesn’t move. Hold for 3-5 seconds, then relax.
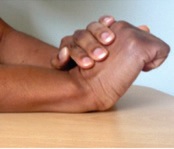
Extension
Rest your forearm on the table, palm down. Bend wrist back (extension). With your unaffected hand, gently push down on your hand and resist this force so that your wrist doesn’t move. Hold for 3-5 seconds, then relax.
Pronation
Bend your elbow to 90 degrees and tuck it into your side with your thumb pointing to the ceiling. Start to rotate your forearm so your palm is facing down (pronation). Place your unaffected hand under your wrist, and gently block the twist. Aim to resist this force so that your wrist doesn’t move. Hold for 3-5 seconds and then relax.

Supination
Bend your elbow to 90 degrees and tuck it into your side with your thumb pointing to the ceiling. Start to rotate your forearm so your palm is facing up (supination). Place your unaffected hand on the back of your wrist, and gently block the twist. Aim to resist this force so that your wrist doesn’t move. Hold for 3-5 seconds and then relax.

Wrist rehabilitation exercises – Stage 4
You should start these exercises at around 8 weeks after your injury/surgery.
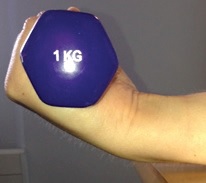
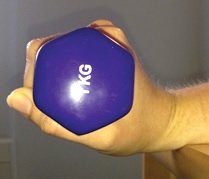
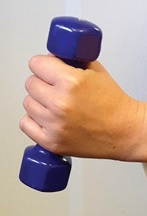
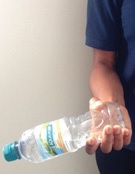
When choosing the correct weight, you should be able to lift the weight 10 times and then your wrist should feel tried. You may need different weights for different exercises. To make the exercises harder you can increase your weight and / or complete extra sets of 10 (up to 3).
Tip: Strengthening exercises should be completed every other day.
Flexion
Holding on to a weight. Begin with your forearm resting on a table palm up, ensuring your wrist is off the edge of the table. Slowly bend (flex) your wrist upwards. Hold for a count of 5 seconds and then slowly lower your wrist. Repeat this movement slowly and smoothly 10 times. Repeat this movement 10 times
Extension
Holding on to a weight. Begin with your forearm resting on a table palm down, ensuring your wrist is off the edge of the table. Slowly bend (extend) your wrist towards you. Hold for a count of 5 seconds and slowly lower your wrist. Repeat this movement slowly and smoothly 10 times. Repeat this movement 10 times.
Wrist deviators
Holding on to a weight. Start with your thumb pointing towards the ceiling. Bend your wrist up towards you and hold for a count of 5. Then slowly lower your wrist. Repeat this movement 10 times.
Weighted supination and pronation
Start with your elbow tucked into your side, your palm facing upwards and your chosen weight in your hand. Move your hand slowly and smoothly so that your palm is facing downwards. Slowly return to the starting position. Repeat 5 times. Make sure you keep your elbow tucked in your side throughout the exercise.
Glossary Of Terms
Educational video links
Below you will find a series of educational videos for you to view which you may find helpful. Please click on the links and you will be taken directly to the videos.
Distal Radius Fracture
Acceptable Alignment at 4 weeks.
Distal Radius Fracture
Post-Surgery – 4 weeks
Distal Radius Fracture
6 weeks
Distal Radius Fracture
8 weeks
Hand Therapy Service contact details
If you have any concerns, please contact us.
Messages will be checked regularly throughout the working week. If you have any urgent concerns outside of the working week, please contact your local out of hours GP or Accident and Emergency department.
This information is intended for patients receiving care in Brighton & Hove or Haywards Heath.
The information here is for guidance purposes only and is in no way intended to replace professional clinical advice by a qualified practitioner.